
‘They give us those nice bright colours. They give us the greens of summers. Makes you think all the world’s a sunny day.’
Paul Simon - Kodachrome
Develop Kodachrome Film using Standard Black and White Chemistry
Prepared by Dean Chartier
The last Kodachrome film was produced in 2009, and the last processing was completed by Dwayne’s Photo on January 18, 2011. Color development of Kodachrome films is no longer possible, however, it is possible to develop the film using a combination of original preliminary Kodachrome process and standard black and white development processes.
The basis for this process is rooted in Kodak Technical Data for Color Films AE-31 and Kodak Processing Steps for Kodachrome Films Z50-03.

Step 1 - Remove the Remjet Backing
The first step in the traditional Kodachrome development process is to remove the Remjet backing This is a key step in successful processing of Kodachrome film.
This is a two step process, the alkaline wash, followed by a rinse to remove the alkaline solution from the film.
The steps shown in the table will remove the Remjet in it’s entirety.
Removing the Remjet as described in Kodak Technical Data for Color Films AE-31 is difficult and will likely result in damage to the film. The information contained in Kodak Technical Data for Color Films AE-31 was designed to allow for film accidentally processed as black and white to be salvaged for use.
Step 2 - Develop using Standard Black and White Process
Kodachrome can be developed utilizing standard black and white process, testing indicates that the timing for development utilized for Ilford HP5 using D76 (1+1) provides the most predictable results.
Fresh fixer is recommended.
Once the film has been stopped, fixed and washed the film can be hung to dry.
Images will be visible while the film is wet, however, once dry it will be too dark to scan or utilize in a darkroom enlarger.
Step 3 is most predictable if the film is dried and re-soaked prior to bleaching. Hypo clear is not required at this point as the film will be subjected to fixer in Step 3.
Step 3 - Bleach Process
This is the final step in the traditional Kodachrome Process, however, in the traditional process bleach and fix are two separate steps. They are combined here as per the steps outlined inKodak Technical Data for Color Films AE-31.
Re-spool the film
Pre-soaking the dried film helps provide predictable resultsin the bleach process.
The suggested bleach concentration provided in Kodak Technical Data for Color Films AE-31is inadequate for successful bleaching of Kodachrome films.
The times shown in the development table are based on a fresh 10% citric acid / fixer mix.
Used fixer may be used in this process as the film has already been fixed in step 2.
Check the film every 5 minutes after 15 minutes to monitor the bleaching, 25 minutes total bleaching should provide adequate clearing to provide excellent scanning and darkroom reproduction in most instances.
If more than one roll of film in a bleaching session is planned, a fresh mixture of the bleaching solution is recommended.
If re-use of the bleaching solution is planned , replenishment of the citric acid is recommended by adding 50% of the original volume of citric acid to the beach / fix mixture. The result of bleaching more than one set of film is less predictable even with replenishment but can be managed with close monitoring of the process, longer bleaching time may be required, even with replenishment, but use extreme caution as over-bleaching will result in loss of the silver on the film.
Standard Black and White Process Results

Positive Color Scan of the finished negative (Raw Scan - no edits)
The negative is relatively clear at this point but there is still a hint of yellowish tint that can be attributed to fine particles of silver left in the Kodachrome film base. Bleaching past this point will result in a clearer base, but also results in loss of the image on the film.
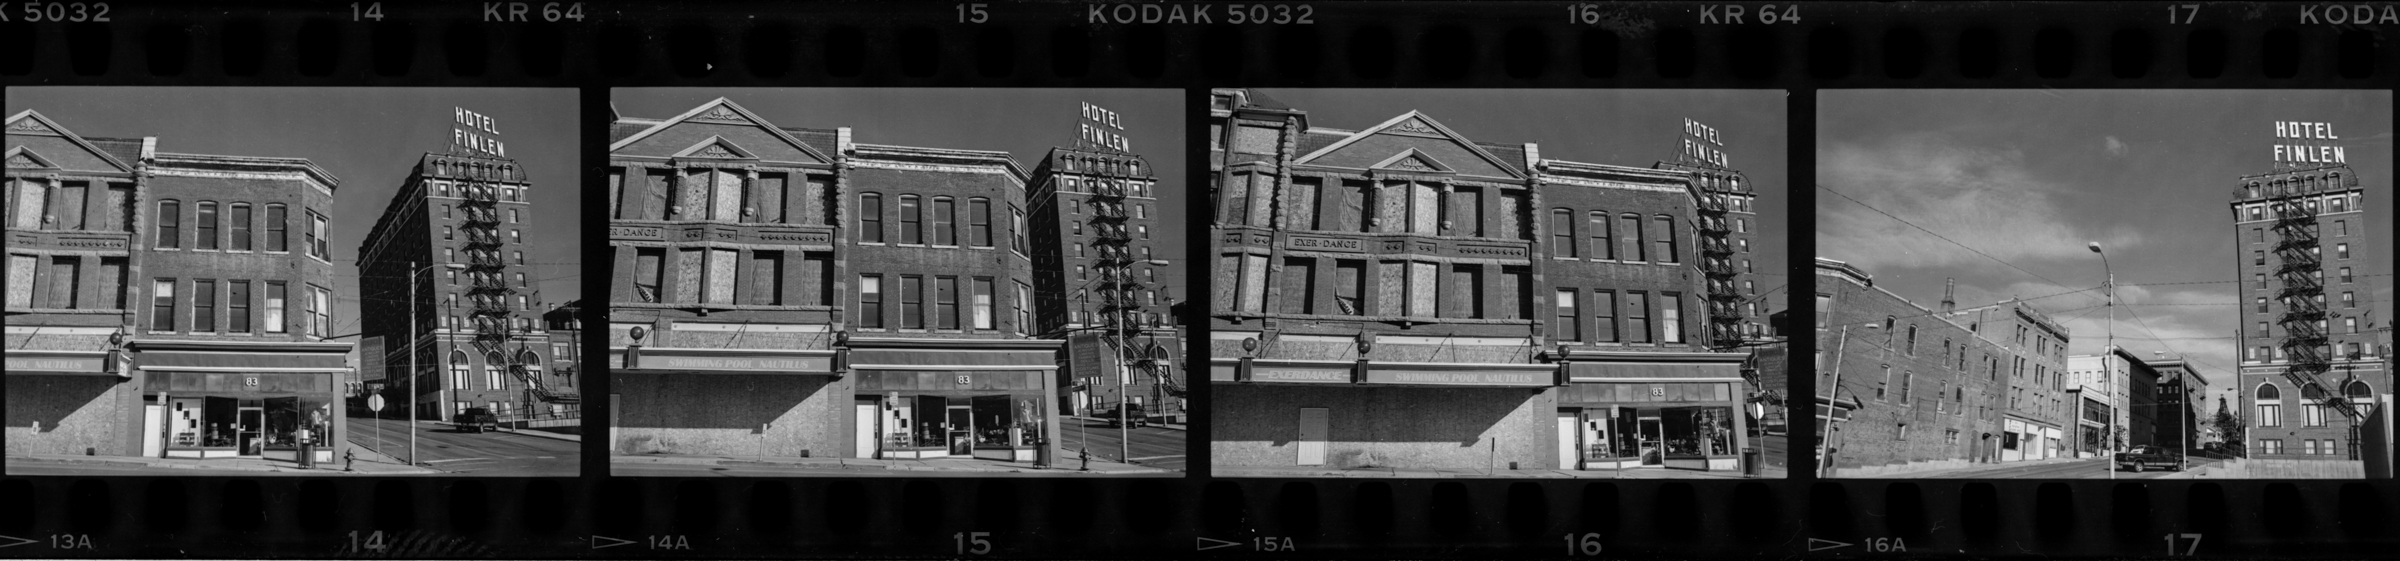
Image Scan of the same negative(Raw Scan - no edits)
Kodachrome prepared as a black and white negative results in an incredibly fine grained image that scans and prints well in a traditional darkroom.

Kodachrome K14 Process showing steps applicable to this process.

Kodak AE31 Technical Datasheet for Color Films
Would you like a printable pdf of this process? Click here.